When powered on, the Loup logo and revision of software will be displayed on screen. For any technical help you may need, the revision of software number would be beneficial.
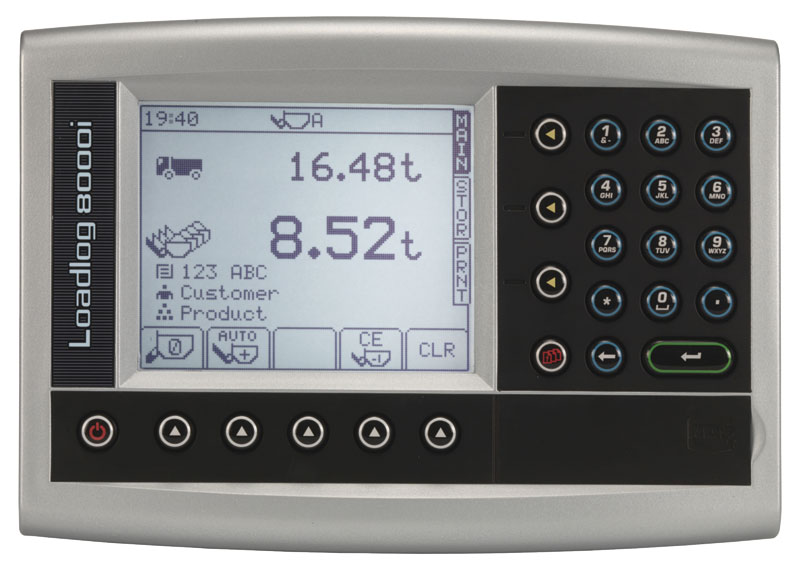
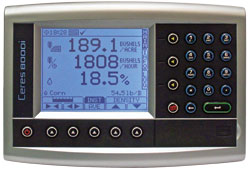
Button Layout
On the main screen the buttons on the bottom (left to right) consist of a “0” key used to zero the bucket at the beginning of the day. The next button is the auto/manual key, pressing this button will change the scale function to auto or manual. Next is the Clear 1 button for use in subtracting one bucket if you don’t want it loaded on the truck. The Clear button is used at the end of a load to clear the display and start the process over again.
Along the right side of the display are the Main, Store and Print buttons. The remainder of the keys consists of a traditional 0-9 keypad. The green “Enter” key corresponds to the white push button in the cab, referred to as the remote enter key. Below the flap is the slot for the SD card slot for the data card, this is used for data logging of loads and other customer data.
Zero the Scale
To begin each day, typically you would zero out the bucket by pressing the “0” key below the screen, to the far left. It will then ask that you lift dynamically and statically. In this example a small weight of .04t was shown on the scale that was then zeroed out prior to operation.
Create a Load
The Loadlog 8000i has the ability to store up to 500 customers and 200 products. To create a load, you may press the “Store” button on the right side of the screen. That button will bring up a full list of customer list for you to choose from. Once you have selected a customer, push the “Enter” key which will then bring up the list of products for you to choose from. Select a product from the list and press “Enter”. At this point you will see on screen that both the Customer and Product you’ve chosen are displayed.
At this point you can begin loading the truck by simple loading the bucket and lifting. As you lift the bucket the weight is displayed. If you have the Auto add bucket feature enabled (2nd white button from the left below the screen) it will automatically adds the bucket load to the total. Once the load is complete you can hit the “CLR” button to finish the load. If at this point you have a data card or printer connected to the unit, the data would be recorded and a receipt printed showing the load details.
From here you may enter the Store screen again to select a different Customer or Product as desired.
Target Loads
Target loads can be entered in prior to starting a load by simply entering in the load amount and pressing the “Enter” key. The upper line on the screen now displays the target load. You may now push the “Store” key to select a customer and product if desired. Again the customer and product data is now displayed on screen. Now when the load is weighed and added to the truck, the weight is subtracted from the target load above. As more buckets are added to the truck, the target amount will continue down towards 0. If the last load is greater than the amount needed to finish the load, it will flash to indicate this. The operator can then lower the bucket to the static position and remove some product. Once the bucket load is within range, the load can then be added with the remote enter key. In this example it shows that the truck was under loaded by .04 tons, with 9.96 tons on the truck.
The target load entered into the unit will be displayed again until entered otherwise by the operator. This number can also be stored with the customer for future loads.
Clear 1 Load
If a load is added that you didn’t want counted, simply press this button to undo the load.
Auto/Manual Button
When in Auto mode, the bucket will automatically be added to the load as lifted. When in manual mode, the operator would need to press the remote enter button each time after the bucket is weighed to add it to the load.
